


Table of Contents Show
For the western world, it is also related to fashion, and if we are to add “how to make a shamrock nail design?” it will also add to it. St. Patrick’s Day is enjoyable and merry, and what’s better than to bind the day with some joy, color, food, and makeup? If you’re going to dress up for the day, your nails shouldn’t be far from the center of attention. So if you’re here to learn how to make a shamrock nail design, it’ll add to the thrill.
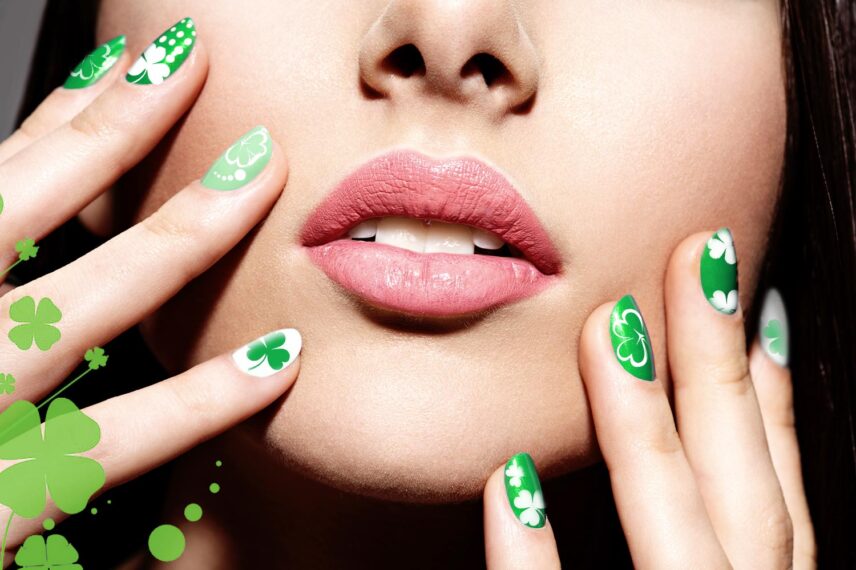
Having a shamrock on the nails might sound like a good idea, but how to make a shamrock nail design?
The primary work is to draw some clover leaves or shamrock on the nails. Colors such as green and gold, as well as shades of green and grey, are available. You can draw the shamrock with a very tiny nail brush, or you can buy stamping stickers on hand for them. Using stencils also makes an easy shamrock design. To make the perfect shamrock nail design, you can use any color and glitter; just make sure that the theme of the celebration aligns with it.
How to begin a shamrock nail design

Before we get on to the more working parts of starting the nail design, let us add some precautions you might want to add to the details. This will help you get the perfect shamrock nail design.
- Treating the Nails
- Base and top Coat
- At Least Two Coats Of Base Color
- Gel Polish
1. Treating the nails

If you’re thinking about how to make a Shamrock nail design, then you must start by clearing your nails. Next, dip your finger in 100% acetone or use a remover pad to remove any sort of stain or residual polish. Then use some cuticle oil and massage it on the nails. And then file the nails. The filing makes a huge difference when it comes to manicures. And you might want to bring it to a proper shape before you start working with the nails.
2. Base and top coat
If you’re starting on your St. Patrick’s Day nails, you must put a transparent base coat under the color coat to prevent stains. And after the design and all, you might want to put a top coat over it. Finally, you can go with a matte or gloss coat at the end.
3. At least two coats of base color
We highly recommend using at least two coats of paint to achieve the opacity if you’re using a base color, even if it is a nude green. Then, clean up the edges using a cotton pad, and let each coat dry before putting on the next one.
4. Gel polish
Gel polish is the best way to make a shamrock nail design, and it’s better to dry and look on when the design can be easily modified.
How to make a shamrock nail design?
Now that we’ve included instructions on how to do a shamrock nail design let us include a detailed way- how to do a shamrock nail. The designs are described in detail, so you’ll have a clear idea of how to reproduce them at home. The designs might serve as a way to inspire the design that goes perfectly with the decor.
- Basic Greens
- Green and Golden
- Green French Tip and a Shamrock
Design 1: Basic Greens

We recommend using several shades of green for this design, or you can just mix the colors and get a design for the nails. Pour a shamrock on the middle finger to truly celebrate St. Patrick’s Day. Here we include a detail on how to do a basic green shamrock nail design.
Step 1: Shades of Green
First, you’ll need to choose at least five or ten shades of green to make the design. If you do not have or need the five shades, just go with the darkest shade of green and white bit by bit and eventually make it lighter. Start with the thumb as the most darling shade of green, and then go lighter with each finger.
Step 2: Draw the Shamrock
As you stated, do the nails with green to make the shamrock present. You can start working with a glittery polish of green or silver and draw the leaves. Or you can just use a stencil to put on the shamrock. Take off the stencil when the design is still tacky to prevent stains and bleeding.
Step 3: Finishing
Use a top coat over the nail color, and you can add a glossy or matte coat to prevent chipping.
Design 2: Green and Golden

This is another basic design to make a shamrock nail design, and for this nail, you will not need tons of colors, but only two of them and maybe some loose glitter for the nail.
Step 1: Basic Green
First, you have to start with the basic green color on your nails. Use at least two coats of green on each of the hands, and just skip the ring finger. This is to create a contrast of colors in the fingers. Let each coat dry before you put up another coat of green.
Step 2: Glitters
While the last coat is still tacky, apply some glitter on top of it. When the glitter has been spread nicely, apply a transparent gloss coat on the top to make the effect last.
Step 3: Golden Polish
The ring finger nail should be painted with glittery gold nail polish. Put at least two coats of gold nail polish on to get the best results.
Step 4: The Shamrock Pattern
Next up, to truly include the excitement of St. Patrick’s Day, you might want to put the shamrock on both middle and ring fingers with the opposite colors. For example, the golden base coat will have a green shamrock, and the green base coat will have a golden shamrock. Use a stencil to draw the shamrock. Or you can do it by using a precise nail brush.
✨ You May like: Black and White Eyeshadow Looks: 5 Popular Looks
Design 3: Green French Tip and a Shamrock

This design is very basic, but we think if you’re just starting with nail art and have perfected your French tips, then this is the perfect way to design your nails for the upcoming St. Patrick’s Day. The drawing of the design is pretty basic, and you can do it by just following some small steps.
Step 1: Green French Tips
To start on the design, you might want to start by coating the nails with a basic green color. Use different shades of green on the French tip. Start with the very lightest shade and go on with the darkest one. You can use a very sharp brush to do the French tips.
Step 2: Make a Shamrock
Next up, you need to draw a shamrock on any of the fingers. We are just sticking to one to make the work easy for us. Start your shamrock with a bright and dark green shamrock. While the design is still wet, apply small green glitters over it.
Step 3: Finishing
Apply a glossy coat of transparent nail polish over the shamrock nail. And you can apply a glossy or matte coat over the other nails.
FAQs
1. How do you do clover nail art?
We suggest using some small brushes to do perfect clover nail art at home. The precise brushes will let you control the design properly. For starters, start withdrawing the outer parts of the leaves, and the best way to do so is by drawing small hearts on the nails, joined by a stem. Or, for a skip, you can use a clover leaf stencil or a sticker.
2. How can I do my nail designs at home?
To do a nail design at home, you will need basic nail colors, a top and basic coat, and some nail art tools. You can easily buy the whole package from a shop or just from online pages. And if you’re using gel polish, we recommend using a UV light to set the nails. Start with the most basic zig-zag or French tip designs, and later, you can go on and learn how to make a shamrock nail design for St. Patrick’s day.
Conclusion
Every year St. Patrick’s Day is one of the most entertaining days for people, and everyone loves to dress up for the barbecue. And besides the regular green clothing and hats, you can just draw a shamrock with green to make the best out of it. The ideas will flow once you clearly know how to make a shamrock nail design. So we’ve included a detailed version of how to draw the shamrock correctly.
Key Points
- How to do nails for St. Patrick’s Day?
- How do you apply a shamrock design to a nail?
- St. Patrick’s Day easy shamrock designs on nails.
✨ Next Attraction: Sad Eyes Makeup: The Latest Tik-Tok Trends


Thank you for your sharing. I am worried that I lack creative ideas. It is your article that makes me full of hope. Thank you.